Print - Ready File Submission Guidelines
Our print-ready guidelines help ensure that your files will successfully move through our production facility quickly and easily. We only accept files that follow the guidelines described on this page and in our Downloadble Print-Ready File Submission Guidelines.
1. Specifications for Designing Your Banner
The first step to achieving a high-quality, digitally printed banner is to make sure that your project file is created using the right settings to begin with. Files created with too little resolution at the start will not look satifactory when the file is printed. Therefore, it is vital to the success of your project to have correct resolution settings prior the creation of your file.
Your submitted files should be created with the following file parameters:
Setting your file parameters in Photoshop
- Launch Photoshop
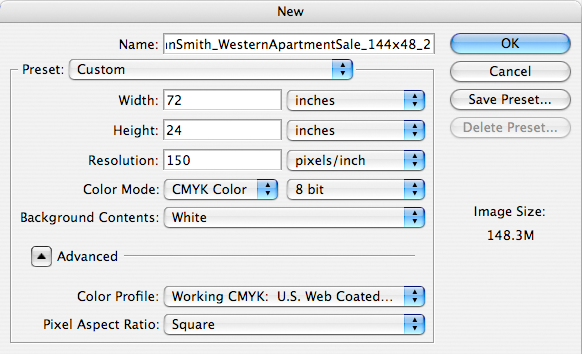
- Once Photoshop is running, Choose File > New.
- In the New file dialog box, type in the Width and Height dimensions and select the inches measurement. Note: File should be created using 75 pixels/inch (ppi) at 100% of the final banner dimensions. For example, if the final banner dimensions are 144”x48”, then you must create your file using 75ppi at 144”x48”.
- Resolution type 75 and select the pixels/inch measurement
- Color Mode select CMYK and select 8 bit for the bit rate
- Background Contents select White
- Color Profile select Working CMYK
- Pixel Aspect Ratio select Square
- Click OK
- Open your file in Photoshop
- If opening a PDF
- Under Page Options select Crop to: Media Box and make sure Anti-Aliased is checked
- Under Image Size enter the Height and Width of your finished banner.
Set Resolution to 75 pixels per inch. Set Mode to CMYK and Bit Depth to 8 bit.
- Hit OK
- If opening an EPS file
- Under Image Size enter the Height and Width of your finished banner.
- Set Resolution to 75 pixels per inch.
- Set Mode to CMYK
- Make sure Anti-Aliased and Constrain Proportions are checked
- Hit OK
- Resize your image to the full size, if not already
- Go to Image (in the drop down menu) > Image Size
- Under Document Size, adjust the Height and Width to the full, finished size of your image.
- Adjust the Resolution to 75 pixels per inch
- Hit OK
- Change the Color Mode
- Go to Image (in the drop down menu) > Mode
- Select CMYK Color
Note: you may need to select “Show All Menu Items” to choose CMYK
- Rich Blacks
- Convert all blacks to Rich Black.
- Rich Black is C:30, M:30, Y:30, K:100
- Flatten Your Image
- Under the Layer drop down menu select Flatten Image
- Save your artwork
- Go to File > Save As
- Change the file name to “username_ filename_heightxwidthxqty”
(Fill in appropriate height, width and quantity for your finished banners)
- Choose where you want to save the file
- Change the Format to TIFF
- Make sure “Embed Color Pro le: U.S. Web Coated (SWOP)” is checked
- Hit Save
- TIFF Options Box
- Select LZW under Image Compression
- Select Interleaved under Pixel Order
- Select IBM PC under Byte Order
- Hit OK
Your file is now saved as a Print Ready LZW-Compressed TIFF
|